
 Bathroom safety is a paramount snooping for families everywhere. Slippery surfaces, expressly in the shower, can lead to accidents and falls, which can be expressly dangerous for young children, the elderly, or individuals with mobility issues. One constructive way to enhance washroom safety is by installing grab bars in the shower. These simple yet essential additions provide stability and support, reducing the risk of slips and falls. In this detailed guide, we will explore everything you need to know well-nigh buying, placing, and installing shower grab bars to alimony your whole family safe.
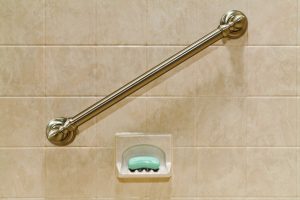
Why Are Shower Grab Bars Essential?
Before we swoop into the installation process, let’s discuss why shower grab bars are so crucial:
- Preventing Accidents: The primary purpose of grab bars is to prevent accidents and falls in the shower. A secure grip on a grab bar can make all the difference when someone slips or loses balance.
- Accessibility: Grab bars make the shower increasingly wieldy for individuals with mobility issues. They provide support when inward and exiting the shower, ensuring everyone can maintain their independence.
- Versatility: Shower grab bars are not just for preventing falls; they can moreover be used to hang towels, shower caddies, and other accessories, keeping your shower organized.
- Universal Design: Installing grab bars is a key element of universal design, making your washroom increasingly willing to people of all month and abilities.
Buying the Right Shower Grab Bars
The first step in ensuring safety in your washroom is selecting the right grab bars. Here are some key considerations:
- Material: Grab bars come in various materials, including stainless steel, brass, and plastic. Stainless steel is a popular nomination due to its tautness and resistance to rust and corrosion.
- Length: Consider the length of the grab bars you need. Longer bars provide increasingly support and can be installed horizontally or vertically, depending on your needs.
- Shape: Grab bars are misogynist in variegated shapes, such as straight, L-shaped, or U-shaped. Choose a shape that suits your washroom layout and provides the weightier support.
- Weight Capacity: Ensure that the grab bars you select have a weight topics suitable for the intended users. Typically, grab bars can support between 250 to 500 pounds.
 Placement Locations for Shower Grab Bars
Now that you’ve chosen the right grab bars, it’s essential to know where to install them for maximum safety. Here are the key locations to consider:
- Entrance/Exit: Install a horizontal grab bar near the archway or exit of the shower to squire with getting in and out safely.
- Inside the Shower: Place vertical or wilted grab bars inside the shower to provide support while bathing. Consider installing one near the showerhead for widow stability.
- Adjacent to the Toilet: If your washroom layout allows, consider installing grab bars proximal to the toilet to squire with sitting lanugo and getting up.
- Next to the Bathtub: If you have a bathtub with a shower, install grab bars on the wall next to it to help with stepping over the tub’s edge.
- Customized Placement: In some cases, you might need to customize the placement based on the specific needs of the users. Consult with a professional for personalized recommendations.
Installation Process
Installing shower grab bars correctly is essential to ensure their effectiveness and safety. Here’s a step-by-step guide:
Step 1: Gather Your Tools
Before you begin, make sure you have the pursuit tools and materials:
- Grab bars
- Wall anchors (if not installing into studs)
- Stud finder
- Level
- Screwdriver or drill
- Mounting hardware
- Measuring tape
- Pencil
Step 2: Determine the Platonic Height and Location
Use a stud finder to locate the wall studs in your bathroom. Ideally, you should install grab bars into the studs for maximum strength and support. If that’s not possible due to the shower’s layout, use wall anchors to secure the grab bars.
Step 3: Mark the Installation Points
Mark the precise points where you want to install the grab bars using a pencil. Ensure they are level and at the correct height for the user.
Step 4: Drill Holes
If you’re not installing into studs, drill holes for the wall anchors at the marked points. Otherwise, skip this step.
Step 5: Nail the Grab Bars
Securely nail the grab bars to the wall using the provided hardware. Make sure they are level and tight.
Step 6: Test for Stability
Once installed, test the grab bars for stability by applying pressure in variegated directions. They should not move or wiggle.
Step 7: Final Check
Double-check that all grab bars are securely in place surpassing using the shower. Periodically inspect them for any signs of loosening.
Conclusion
Installing shower grab bars is a simple yet constructive way to enhance washroom safety for your unshortened family. By choosing the right grab bars, determining the platonic placement locations, and pursuit the installation process correctly, you can significantly reduce the risk of washroom falls and accidents.